Friday, November 25, 2011

Potato Pancakes

Let the leftovers begin! I made a mountain of mashed potatoes for Thanksgiving and this morning we had potato pancakes for breakfast. Super easy recipe that you can easily adapt to your taste or what you have in the fridge.

This recipe made 6 medium pancakes.
  • 2 cups mashed potatoes
  • 1/3 small onion grated
  • 3 slices cooked bacon
  • 1 egg, beaten
  • butter for pan

Beat egg in bowl, to that add additional ingredients. Melt in skillet butter, drop spoonfuls into pan and press flat, I found them to be gooey so I sort of had to pry them off the spatula with a butte knive. Let cook about 8 minutes until crisp, flip and cook additional 6-8 minutes, watch for done-ness.

Serve with chives and sour cream.

Tuesday, November 22, 2011

Black Friday and Cyber Monday Sale

I rarely do sales, sure I mark things down from time to time, but an all out shop wide sale, not so much. But since I elected to not do any shows this holiday weekend I thought I would join in the online fun, well I hope anyway.

Etsy is or will be promoting 3 tags this weekend, Free shipping Etsy, Black Friday Etsy, and Cyber Monday Etsy. You can read more from the etsy November Merchandising Desk here in this blog post. I will be doing a combination of offerings; free shipping on some items and discounts on other items and in particular my BlackFridayCyberMonday section will especially be discounted.

I have been busing getting my shop ready, here is what I have done so far and what I still need to do to be totally ready.

I am using a few off etsy apps to help get ready as well, I signed up for Etsy On Sale over the summer and finally did the full read through to apply sales, and change tags in my shop. I also bought the 25.00 package and got 125 credits to use. You can use these credits whenever you like, each action you apply to your shop costs credits. A sale is 4 credits, and a tag change/addition/delete is 1 credit.

I also will be trying for the first time a few of the apps on Craftopolis there you can edit a title and the first paragraph of your listing, these are suggestions made by etsy if you are participating.

Readying my shop:
  • I cleaned up my sections, condensed items and reduced the number, this was to help reduce cost of using etsy on sale. Since credits are applied by entire shop or by section having less sections will reduce that cost a bit.
  • Reviewed ALL my tags, this has actually been an ongoing project but I finally went through one by one and made my tags more relevant and also made sure I had enough room to add the 3 etsy tags for this event.
  • I am listing...a lot, I hope to have nearly 200 items listed by Thursday, I have been doing this since early October, I have listed about 125 items since then.
  • Created a "Free Shipping profile" to be applied to some of my listings, this will only be for US transactions.
  • Writing my new first paragraph for my free shipping and % discount that I will add via Craftopolis later this week. I like to type it out and live with it for a few days first.
I plan to have most of this and ready to go on Thursday, with EOS you can schedule so mine will begin at various times late Thursday to midnight on Friday.

You will have to check out my etsy shop for the sales and deals, and free shipping items. I hope it will be a fun sale for buyers to get some of their shopping done!

Saturday, November 19, 2011

Shrine Show November 18 and 19th

Had a GREAT time at the Shrine show Friday night and will be heading back this morning. My spot was next to my friend Molly, from MollyCoddle Tiles. I had a great time meeting new people and hanging out among such creativity.

This is just a few quick pics to share of my space, looking forward to this morning, and going to grab a few bake sale goodies as well.

Monday, November 14, 2011

Craft Show Craziness...Readiness

I do a limited amount of shows each year so for me they are always a panic, so much to do above and beyond making the items. This year I am hoping to be more organized and less panicked. I have the first of three this coming weekend and now that it is Monday and set up is Friday I am actually starting to pack up now (really RIGHT after I post this to my blog).

I also thought I would give a checklist of things I need and want to take along, I know when I started I was somewhat guessing. Here are a few of my essentials.
  • Change, I bring $80.00 in paper money, usually 4 10's, 4 5's, 20 1's, plus coin since I collect sales tax, I just bring a lot, at least 30.00 in coins.
  • Sales tax license
  • Secure location for money
  • Receipt pad(s)
  • Pens, scissors, tape, small notepad
  • Calculator
  • Clip board, for checks and receipt signing
  • Merchandise bags, I have 3 sizes
  • Business cards, postcards, fliers, etc.
  • Table coverings
  • Gridwall hardware, I keep this stuff in a small plastic box, also I need for some assembly screwdrivers, plier and wrench, good to have all.
  • Apron, I also stock this fully before the show with some cash, business cards, pens and a small calculator, also a lip balm :)
  • Bowl of candy - obviously optional
  • Small decorations, I sometimes bring a few nutcrackers along to add a festive touch to my table, since the shows are actually Christmas I am not worry about offending, just be mindful of the crowd if you choose to decorate.
  • Signs or pricing, I often just price in bulk and use mini frames to help sign, I once did a blog post on this idea here
  • Cosmetic bag with a few personal items, make up, brush, toothbrush, etc.
  • Small cooler or lunch bag, I always bring water, soda, and dry snacks such as pretzels, granola bars.
  • Grocery bags for garbage collection at my booth
  • Printed list of above
  • Admin basket or bag, I use this to keep things I will always need to know right where they are, like my apron, cash, lists, etc.
Some pics of my spare room, top, stacks of stuff needing to be priced and placed, middle my growing collection of baskets, its good to have options, and the guest bed, which is really just another table.

I am lucky to have a good size extra bedroom and am able to set up a 6 foot table, which seems to be the standard size for inside shows. Here I can play with my displays and items and have a good idea of set up before I get to the show. I also draw a little diagram and refer to it when I get to the show. For me my mind is always racing so having this for references does help. If you cannot use an actual table, mark out your space on the floor or bed a visual before the show helps a lot.

Here is a sort of picture of what I will do at the show, I have a fair amount of flexibility to move around as needed. Making this and stapling it to my checklist and make sure it goes to my admin basket for the show.

Sunday, November 13, 2011

Columnists | Crafter turns fabric into practical items | The Detroit News

I am super excited about my weekend feature in The Detroit News. I had the chance to share one of my accessories and talk a bit about my selling life. I did an event Saturday at "State of MInd" it was fun to have several people say they saw me in the paper. Here is the link to the article below.

Columnists | Crafter turns fabric into practical items | The Detroit News

I still need to actually get my hands on a copy for myself, as I sort of missed it when it came out on Friday. I have a few nice folks who will be saving it for me.

Monday, November 7, 2011

New Item Stocking Stuffer Coin Purses

I have a new item this year, very Christmas like, which is unusual for my shop. I rarely sew any holiday items as they don't do very well for me...really, not everyone wants a Santa purse?

So, I have had this idea for a few years and finally did it. I was in the sewing room on Saturday and actually felt kind of bored - very unusual feeling. I remembered this idea and having a few holiday shows and stacks of Christmas fabric I finally worked up a design and started making these. I am calling them "stocking stuffer coin purses" kind of cute, huh? This way I can also legally use "stocking stuffer" on etsy and be found by eager holiday shoppers...tee hee!


A little bit of the design process, pattern pieces for the stocking and lining, then the revision, I wanted it wider and rounder, I re-drew my pattern and ended up with the perfect size.

So this is how it starts, I need a stocking shape, I have several books on stockings so I pulled those out and adapted one to the size and shape I wanted. Luckily I only had one that was done first that was not my desired size, a quick edit and I not have the sweetest stocking coin purses. Added to each a vintage jingle bell and these will great to use all season long. I plan on using mine to keep all my Christmas Receipts in ONE place in my purse.


While I am really planning these for offline events and markets I could not resist adding a few, above are the first two I added to my etsy shop.

A close up peek of these vintage jingle bells, and all the colors one last time!

Friday, October 28, 2011

Jack O' Lantern Quilt

This is just a show and tell of a Halloween quilt I made several years ago. I love pulling it out each year it is so colorful and fun. I have some guests coming so I thought it would be a fun addition to the guest bedroom.

This was from Fons and Porter, originally it was in a magazine, probably in early 2000's, it was later found in their book "Best Loved Seasonal Quilts". I made the quilt pretty much to spec, however it took me the course of two or three Halloweens to find the fabric for the border and then the flannel back.

Fun quilt to have around this time of year, I usually leave it out through Thanksgiving.

Sunday, October 16, 2011

Greenwood Cemetary Tour

It was a fall blustery day, the kind you just want to stay in and sew or nap, or anything not outside. But for a cemetery tour it was probably the perfect day, the sun was shining so it ended up being a great way to learn a little about the early days of our town. A guided tour that featured local volunteers who told stories of notable pioneers buried there.

I live in Birmingham MI, a northern suburb of Detroit which was founded in 1818. The cemetery was founded or started in 1821 as the result of a double murder. The Utter family who were a farming family had employed a veteran of the 1812 war, he axed to death the mother and 1 daughter. It was a fellow resident who was so upset at this news that he donated a part of his property for their burial. During that time most were buried on their own property or farm, the Utters however leased the land they farmed so there was no place for them to be buried, so Greenwood Cemetery was formed.
Above first monument, burial site, Utter double murder

Utter family monument
The cemetery became the place for most burials of that time and has many founding and formative members of Birmingham early pioneering days. There are many civil war veterans, and many from both world wars as well.


The cemetery's only Revolutionary war veteran, above, also the earliest born within the cemetery.

This was a "first members of flight" those early aviation pilots who flew solo before 1917

The tour in the fall focuses on the forming of the cemetery and those notable residents who died up to about 1920 ending with Martha Baldwin who was a very outspoken women of her time and whose impact is still relevant in Birmingham today. She was the founder of Birmingham's Public Library, called Baldwin, she also headed a group of women and often financed the upkeep of the cemetary during the early 1900's. When she died she deeded her entire estate and property to the city, with strict usage requirements, many of the properties are parks, schools and city buildings. Martha was not always received once being quoted "the more time I spend with men, the more I like dogs".

The cemetary is still active with buriels still taking place, however most are family plots that have been acquired many years prior. We were told that their is a waiting list that is quite long, but with a little luck and a lot of time you could be buried here.

I took a few shots of some interesting monuments throughout the cemetary. The bronze sculptures are the work of a local artist and can also be found throughout our city, 3 of his works are here, I could not find the 3rd, it is much smaller.


Admittedly I wish I were better versed in local history, I plan to join the Friends of the Historical Society this month. I have already volunteered to help with a quilt exhibit that is coming in January and will be helping in the hand quilting of a quilt being shown and raffled.

I hope to squeeze in another self guided walking tour of this museum before the weather gets real cold and take more pictures and visit additional notable graves. The spring tour in April will also be another opportunity to visit Greenwood Cemetery.

Saturday, October 15, 2011

SNS October 15th

I joined in the SNS for this week, my first time literally in years. Of course on etsy now there is no promotional forums so there is an SNS team, which I joined a while back.

During SNS there is an opportunity to chat and visit with other shops having sales and since this new team there are lots of shops making treasury lists featuring fellow SNS sellers.

I made this one, starting by adding those shops that included an item from my shop.


And here are a few my creations were featured in to share as well.


Wednesday, October 12, 2011

Rummage Sale Finds

Fall is definitely here and so are the rummage sales, great place to get items for craft show displays. I owe a thank you to my sister in law who volunteered recently and had kind of a first pick of the items donated. She managed to snag me 6 metal baskets, my fave for displaying my creations.

Best part, she got all 6 of them for $8.00, recently I have needed to get more of these due to my participation at State of MInd and the local shows I am doing this fall. Here are the baskets she got for me and a quickie makeover for one of them is below.

Lovely round basket with handle

Rectangle with handle, wicker bottom

This was the largest, with ivy accents


This one I did a quickie makeover, there was a 6 x 6 inch tile on the bottom, not really my style so a piece of scrapbook paper cut to size covers it nicely.

Tuesday, October 11, 2011

Jessie Costume Ideas and Tutorial (sort of)

We started planning and buying for my daughters Jessie costume I think in March, so no excuses to not get done!

I had purchased from mom to mom sales a pair of jeans for $1.00 and a white oxford for $3.00 feeling very economical and smart for making this costume for such a great price. Well as these things go the devil or cost is in the details.


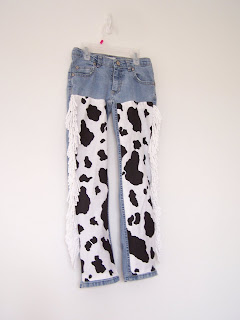
For the costume I had to add cow fabric, yellow fabric and red trim for the shirt, and the white fringe for the jeans which is probably my favorite part was in fact the most expensive, I think my bill still is less then about $20.00 not so bad...but there will be more we still need shoes...or boots as my daughter reminds me and a belt or something that will resemble a belt.

So as it is just the 11th of October I have the jeans and the hat completed, actually for the hat I still want to add ribbon accent and elastic for keeping it in place. And of course there is all that red yarn hair!

Great part about this was learning how to attatch the fabric to the jeans, literally up in bed one night thinking about it I realized that I would have to take the jeans apart slightly to do this with my machine. The option of hand appliqueing was a consideration as well, ultimately I decided this would be easier, I think it was.

I tore out the serged and sewn seams on the outer part of the jeans, from the hem, up to the reinforcement stitching which is just about at the pocket. You can sort of see below, sorry for the blurred pics.

Next I made my cow fabric insert, really all I needed to do was make more or less a rectangle, since the side seam of the jeans was open I just let that hang over and catch it when putting the jeans back together. I ironed a hem for the inner leg and the top (at a slight angle) used lots of pins to pin and place and sewed down to the jeans using a monofilament quilting thread (clear).


To finish, layer the jeans back together inside out with fringe inside, sew jeans back together and re-hem

The red hat was super easy once I found this foam hat at the Dollar Store - hooray, was considering a $25.00 option on Amazon. A simple yarn embellishment makes this close to the Jessie original.

Simple enough I marked all the way around the hat I did about 3/4 inch in from the edge and about 1 inch apart. Weave the yard around and tie off underneath the hat, I also taped it down, left the tails long for now...just in case.

Completed jeans and hat, so excited to have these done, I will be doing posts when I complete the shirt, hair and yes the belt.
Related Posts with Thumbnails