Saturday, July 31, 2010

Fun With a Baguette: Garlic Bread


I hope to make this a weekly (or so) feature, or as long as baguettes remain .89cents on the weekends at the corner gourmet market.

Baguettes are so versatile and fun to use in cooking, as a last minute starch side dish I use them a lot, and will share ideas you can use too.

The first is just a super simple garlic bread, so simple it only uses 3 ingredients.

Baguette
Butter - softened
Garden Salad Seasoning from Penzeys Spices***

****Penzeys spices is an online retailer of spices, they have all the traditional spices you find at the grocery stores, plus many proprietary spice blends like Garden Salad Seasoning, used above. They do have limited storefront retailers, and are well worth seeking out, I personally have replaced pretty much ALL my usual spices with theirs, and have quite a collection of their unique spice blends, in fact I am a little bit obsessed with quite a few of their spices.

Garden Salad is a blend of Romano cheese, salt, sesame and poppy seeds, garlic, onion, salt and white pepper.

If you don't have Penzeys, you can substitute, garlic in any form, powder, grated, jarred.

Other things you can add to your garlic bread:
  • Cheese, really lots of cheeses work well, Parmesan, mozzarella, Romano, I have even used cheddar. Works better if it is a graded or shredded variety.
  • Onions, chives, basil, parsley, fresh or dried, sprinkle to taste
  • Salt, again to taste
Cut baguette about 3/8" thick, spread with softened butter, sprinkle with seasoning, then rub around butter/seasoning. This helps the seasoning incorporated into the butter and stay put during cooking.


On medium-hot non stick skillet, put buttered side face down. Cook 3-5 minutes, peeking to watch for done-ness. I prefer less done then DH so I take a few off early.


I served as a side dish, is yummy with spaghetti!

Enjoy!

Saturday, July 24, 2010

Small Area White Photo Back Drop


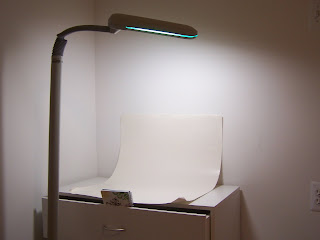
Easy and inexpensive white photo backdrop all you need is an area, good lighting and a piece of white poster board, the kind you can get at the drugstore. I have literally been using the same piece for about 5 years, and it still works great.

I have a small dresser type piece of furniture that I use for picture taking, to achieve the blank white background you need to position the poster board so it is curved. Most times the weight of the item holds in place, but you could secure it with tape or something on the front end to hold it in place. Sometimes I put a book in the drawer to serve as a stopper, low enough so it does not show up in the pictures.

For lighting I use the rooms overhead light and an Ott Lite I can move and focus in on the object.

After I take pictures if the board is still showing a quick crop on a photo edit program will give you a clean plain backdrop. I use picnik.com to crop and adjust the exposure as needed.

Thursday, July 22, 2010

Simple Thank You Notes

Early on in selling online I came up with these simple, low cost and colorful thank you notes. I had collected a lot of 12 x 12 scrapbook paper and often get the value packs at craft stores and this method utilizes the entire 12 x 12 sheet.

Directions assume some capability with Microsoft Word or other writing program, be sure to include your site address and a place to sign each card.

From each 12 x 12 sheet you will get:
2 folded 4 x 5.5" you can use to print your message
2 folded 2.75 x3.5" blank mini card to write a message
1 1 x 12" leftover

Supplies
  • Assortment of papers
  • Rotary cutter, mat and quilt ruler at least 12 inches in length
  • Computer and printer
Assortment of scrapbook papers

Using your rotary cutter/mat/ruler, trim the 12 x 12 inch sheets following steps:

1. Orient your pages so they are right side up, if there is an image orientation, with a rotary cutter you can cut multiple pages at a time, I did 5 sheets at once. From top cut off 1 inch, set aside, this will be a leftover piece.

2. Remaining piece will be 11 x 12, from side cut off 3.5 inches. You will now have a group that is 3.5 x 11 inches, and a group that is 8.5 x 11 inches.

3. From your 3.5 x 11 inch strips, cut in half at 5.5 inches, now these sheets can be folded in half to give you 2 blank 2.75 x 3.5 inch cards

4. Your sheets will give you these pieces, you can now take your 8.5 x 11 sheet and print off your message inside. I use Microsoft Word and orient the text to the right, so when printed I can fold and open to see my message. It is a good idea to do a few practice sheets to make sure you have spacing correct, cut the test before using your scrapbook paper.

5. After your sheet has gone through the printer cut at 5.5 inches, to get your two note cards.

6. You will now have stacks like show above, all that is left to do is fold and tuck inside your orders.


Some ideas on what to include inside; thanks, custom order info, coupon codes, blog info, mailing list, upcoming specials events, selling venues. I also leave a a space to include a hand written edition to each note, about 1-2 inches works for me.

The little blank cards are great for a little hand written note and will hold a business card nicely as well.

Wednesday, July 21, 2010

New Items Shopping and Drawstring Bags

I love collecting re-usable shopping bags, and now I love making them. I have come up with two sizes and have begun adding them to my etsy shop.

In addition to the shopping bags I have included drawstring bags to my line as well, I have just a few listed now but hope to expand upon them by fall, both for online and offline events.

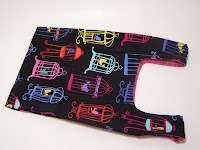
You can see in my shop now, mini shopping bags, or 10 items or less bags, each complete with a drawstring pouch for carrying.

I deconstruted a standard plastic grocery bag and then came up with a pattern for making the same size and shape. I used a few online resources to get the finishing touches and am really pleased as a shopper and as an item to add to my shop.

So far I have listed just the minis, they are just that small bags that can be used when running out to get just a few items. I was able to fit in this size the items below, now with all these items it is quite full, but will hold them until you get home.

All these items fit in the mini shopping bag

Mini Shopping Bags w/drawstring pouch $10.00

Each mini comes with its own drawstring carry bag, fold directions below


Store your mini, fold in thirds lengthwise, fold in thirds and again folding handles down first, then final fold in thirds, now it will fit into the drawstring bag perfectly.

I have done a few large or standard size grocery bags that I am using myself or have tucked away for Christmas Gifts. I hope to collect some fabrics and add these later in the summer and for fall for sure.

So far I LOVE them, they hold a lot and owing to the double fabric construction and french seams they hold a heavy load. A recent test run to the library I was able to hold about 15 pounds of books. It would have actually hold more then this but this was my limit to carry and juggle a 4.5 year old, the bag felt strong and sturdy!


When I add the larger bags to my shop I will do them as singles or as doubles with their own large drawstring bag. Below is the first I have done, I actually will be giving this one as a gift for Christmas...shhh, don't tell. The drawstring bag has an exterior pocket and the grocery bags are the same as the pocket, all tied up for shopping.

Making the drawstring bags inspired me to make some linen ones and offer them as accessories in my shop, below are the first of many I hope to offer. I will vary sizes and looks, I just love these versatile bags.


Linen Drawstring Duo with String Pieced Pockets $22.00

Be sure to check back for more shopping bags both mini and full size as well as a variety of drawsting bags, I also have in the works a child back pack that is a drawstring style. See you soon!

Thursday, July 15, 2010

One Bunch of Flowers 6 Vases


I recently collected six of the same size and shape vase, a few I had a few I found at a garage sale. The garage sale finds were actually brand new from a flower shop that closed down due to retirement. I got 4 vases for 1.00, such a deal and already put to use.

A $10.00 bouquet from a local flower shop, daisies, carnations, greens, stattice a few others I don't know the names. Some Queens Anne Lace I spared from being mowed down I was able to fill 6 bud size vases for a party this weekend.

Won't these look great scattered around the tables, sprinkle in some candles and it is a great and budget friendly to add color to your party. Or, just do it for fun!

Tuesday, July 13, 2010

Tomato Salad

Summer means lots of tomatoes this is a favorite of mine, for a quick side dish.

2 Tomatoes sliced
2 TBLS Ketchup
2 TBLS Cider Vinegar
Sugar
Paprika - I use Penzys Smoked Hungarian
Sugar

Slice tomatoes and put in a glass bowl or jar, add ketchup and vinegar. Season to taste with sugar, salt and paprika, use a couple good pinches for the most taste.

Chill for up to 4 hours, place tomatoes on torn lettuce of choice, drizzle with remaining dressing.

Enjoy!

Monday, July 12, 2010

UpCrafted Galvanized Pan

I recently found this galvanized tub at a garage sale, it kind of looks like an oil pan of some kind and was in really good condition, and not used for oil. I paid $2.00 and knew I could turn it into something functional and a little bit prettier. I first thought it would make a good container for craft show displays and in the meantime it makes a good table accent.

I originally imagined I would paint it I envisioned hot pink and lime, but after a little online research I remembered I tried this before with not so good results. Also I think it will make a good drink tub so painting it became even less appealing.


My found tub, just needs a quick scrub

To draft a pattern for this, was pretty easy and with basic sewing skills you could do one like it too. Supplies: Paper, tape, pencil, rotary cutter/mat, sewing machine, fabric, thread.

It took about 1/2 yard of fabric. I traced the bottom of the tub and got a 14 inch circle, if I did another I would add 1/4 inch for the seam allowance all the way around making it a 14.5 inch circle. It worked just fine but that is one adjustment I would make.

To make the side pieces you will need three measurements:
Top circumference: 47 inches around
Bottom circumference: 45 inches
Side, to the bottom wrapped around the top and down to the side +1" hem 7.5 inches

You will take your top measurement, divide by two then add 1/4 inch, for me the 2 strips I cut were 23.75 inches long by 7.5 wide.

To compensate the difference from the top to the bottom you will need to trim about 2 inches from the bottom. Do this by dividing the difference by 4 (four sides) and trim this amount from each piec. Angle from the top, starting at the corner to the bottom, at the bottom piece it should be 1/2 inch, so you are cutting a thin long triangle from each piece.

Next, sew right sides together side pieces so you have a big circle, hem. I have a nifty way I pin and mark a starting point. Pin two pins right next to each other, leave these pins in as you sew, when you see them come around this is your stopping point. This is especially helpful if you are using a very close matching or invisible thread.

Sewing tip:
Use 2 pins right close to mark begin/end of stitching


Stop and fit your sides to your pan, at this point you can make and adjustments to the fit before you attatch the bottom circle. I actually found I needed to taper my bottom more, so I went back and stitched another 1/2 inch on my side seams, tapering to the bottom, starting about 1 inch below the hemmed top.

Pin bottom to top, clip less then 1/4 inch into the circle to ease bottom curved seam. I found I needed to add a few pleats along the way to make the fit, these did not show in the end result.

In the end I have a great item that I can make additional covers for, it took about an hour and now that I have the pattern the next one should be even faster.

Just fill with table goodies like napkins, salt and pepper, seasonings, toothpicks, sugar, sweetener, and a vase.

Thanks for looking!

Sunday, July 4, 2010

Happy 4th of July


Hope everyone is having or had a great fourth of July. We have had a fully packed holiday weekend and just now settling in before we do some sparklers. I will be sure to share our outings in the upcoming week.

Have fun and be safe!!!

Happy Birthday America! ! !
Related Posts with Thumbnails