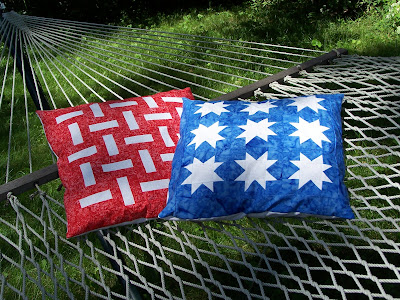
 So I have had these pieced pillows on my mind for a few years now and finally decided to put them together. A stars and stripes pillow pair for the fourth of July, I chose bright batik prints over dark traditional colors and am super pleased with the outcome. These pillows have an upcycled twist as I used white oxford shirts for the backing.
Here are some basic instructions to making a set for yourself, or at least think about making, and tips on using a shirt for a backing.
Fabrics, I used a red, white and a blue (really did I need to tell you that)? You could do this in Christmas colors, or fall colors or whatever, versatile enough for lots of occasions.
You will need, fabric, thread, sewing machine, rotary cutter, old shirt or backing fabric same size as pillow fronts. Use 1/4 inch seams throughout, this is very important for accurate piecing and getting your pillow fronts the same size. Instructions assume some quilting and sewing experience, questions just let me know or post and I will do my best to answer.
Fabrics:
- Red - 3/8 yard
- White - 1/2 yard
- Blue - 3/8 yard
Blue and white sawtooth stars:
Blue Fabric: 36 @ 2 x 2 inches
36 @ 2 x 2.5 inches
White Fabric: 9 @ 2.5 x 2.5 squares
75 @1.5 x 1.5 squares
Making the star points, assemble by sewing corner to corner 1.5 inch white square to a 2.5 x 2 inch rectangle, trim, iron and sew a second 1.5 inch square to make a flying geese, you will need 4 of these to make a single star. Make 9 star blocks, sew together.
Red and white Rails:
Red Fabric: 6 @ 1.5 inch x width of fabric (WOF)
White Fabric: 3 @ 1.5 inch x WOF
You will need to make three sets of the red and white strips, do this by sewing red to white, then another red. Your strip width should be 3.5 inches, this is important to be accurate as you will then trim your long strips down to 3.5 x 3.5 squares. Once trimmed use 20 to create the pillow, rotate and sew blocks as shown.
I have some throw pillows and just decided to cover those for the season rather then buy new, this meant I was a little short on the front. To make up the difference I just added a border to each side, just measure your top and pillow and add your border, be sure to take in 1/4 seam allowance for the top, and the sewing the back to the front, for me this meant a 2.5 inch border on all 4 sides.
Using an old shirt for the backing. Great way to use and old shirt, this was the first time I did this so I will share what worked and well, what did not work.
Be sure the shirt front is as big and a little bit bigger is better then your pillow front. Cut the front body of the shirt from the back, you may need to use the seam where the sleeve is as part of the backing if your pillow is too big to do from the sleeves down. The first one I cut out I trimmed away the sleeves, the result was the pocket was sewn closed and the buttons were awkwardly placed on the back, it worked but I like the pocket to show fully and the buttons to be placed somewhat centered and functional on the back.
Next lay your pillow on the shirt, using your rotary cutter cut the shirt to the same size as the pillow. Pin right sides together and stitch around all 4 sides, be sure to open buttons prior to sewing so you can flip your pillow right side out.
I plan on sewing some red and blue star buttons on and will show those off when done, first I have to find them.
Now you have some pillows to kick back and relax on the fourth, think I will be spending some time with these in the hammock, well I hope!


1 comment:
great project! thanks for sharing!!
Post a Comment