This is just a show and tell of a Halloween quilt I made several years ago. I love pulling it out each year it is so colorful and fun. I have some guests coming so I thought it would be a fun addition to the guest bedroom.
This was from Fons and Porter, originally it was in a magazine, probably in early 2000's, it was later found in their book "Best Loved Seasonal Quilts". I made the quilt pretty much to spec, however it took me the course of two or three Halloweens to find the fabric for the border and then the flannel back.
Fun quilt to have around this time of year, I usually leave it out through Thanksgiving.
Friday, October 28, 2011
Sunday, October 16, 2011
Greenwood Cemetary Tour
It was a fall blustery day, the kind you just want to stay in and sew or nap, or anything not outside. But for a cemetery tour it was probably the perfect day, the sun was shining so it ended up being a great way to learn a little about the early days of our town. A guided tour that featured local volunteers who told stories of notable pioneers buried there.
I live in Birmingham MI, a northern suburb of Detroit which was founded in 1818. The cemetery was founded or started in 1821 as the result of a double murder. The Utter family who were a farming family had employed a veteran of the 1812 war, he axed to death the mother and 1 daughter. It was a fellow resident who was so upset at this news that he donated a part of his property for their burial. During that time most were buried on their own property or farm, the Utters however leased the land they farmed so there was no place for them to be buried, so Greenwood Cemetery was formed.
The cemetery became the place for most burials of that time and has many founding and formative members of Birmingham early pioneering days. There are many civil war veterans, and many from both world wars as well.
The tour in the fall focuses on the forming of the cemetery and those notable residents who died up to about 1920 ending with Martha Baldwin who was a very outspoken women of her time and whose impact is still relevant in Birmingham today. She was the founder of Birmingham's Public Library, called Baldwin, she also headed a group of women and often financed the upkeep of the cemetary during the early 1900's. When she died she deeded her entire estate and property to the city, with strict usage requirements, many of the properties are parks, schools and city buildings. Martha was not always received once being quoted "the more time I spend with men, the more I like dogs".
The cemetary is still active with buriels still taking place, however most are family plots that have been acquired many years prior. We were told that their is a waiting list that is quite long, but with a little luck and a lot of time you could be buried here.
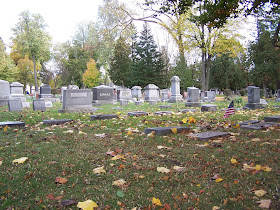
I took a few shots of some interesting monuments throughout the cemetary. The bronze sculptures are the work of a local artist and can also be found throughout our city, 3 of his works are here, I could not find the 3rd, it is much smaller.
Admittedly I wish I were better versed in local history, I plan to join the Friends of the Historical Society this month. I have already volunteered to help with a quilt exhibit that is coming in January and will be helping in the hand quilting of a quilt being shown and raffled.
I hope to squeeze in another self guided walking tour of this museum before the weather gets real cold and take more pictures and visit additional notable graves. The spring tour in April will also be another opportunity to visit Greenwood Cemetery.
I live in Birmingham MI, a northern suburb of Detroit which was founded in 1818. The cemetery was founded or started in 1821 as the result of a double murder. The Utter family who were a farming family had employed a veteran of the 1812 war, he axed to death the mother and 1 daughter. It was a fellow resident who was so upset at this news that he donated a part of his property for their burial. During that time most were buried on their own property or farm, the Utters however leased the land they farmed so there was no place for them to be buried, so Greenwood Cemetery was formed.
The cemetery became the place for most burials of that time and has many founding and formative members of Birmingham early pioneering days. There are many civil war veterans, and many from both world wars as well.
The tour in the fall focuses on the forming of the cemetery and those notable residents who died up to about 1920 ending with Martha Baldwin who was a very outspoken women of her time and whose impact is still relevant in Birmingham today. She was the founder of Birmingham's Public Library, called Baldwin, she also headed a group of women and often financed the upkeep of the cemetary during the early 1900's. When she died she deeded her entire estate and property to the city, with strict usage requirements, many of the properties are parks, schools and city buildings. Martha was not always received once being quoted "the more time I spend with men, the more I like dogs".
The cemetary is still active with buriels still taking place, however most are family plots that have been acquired many years prior. We were told that their is a waiting list that is quite long, but with a little luck and a lot of time you could be buried here.
I took a few shots of some interesting monuments throughout the cemetary. The bronze sculptures are the work of a local artist and can also be found throughout our city, 3 of his works are here, I could not find the 3rd, it is much smaller.
Admittedly I wish I were better versed in local history, I plan to join the Friends of the Historical Society this month. I have already volunteered to help with a quilt exhibit that is coming in January and will be helping in the hand quilting of a quilt being shown and raffled.
I hope to squeeze in another self guided walking tour of this museum before the weather gets real cold and take more pictures and visit additional notable graves. The spring tour in April will also be another opportunity to visit Greenwood Cemetery.
Saturday, October 15, 2011
SNS October 15th
I joined in the SNS for this week, my first time literally in years. Of course on etsy now there is no promotional forums so there is an SNS team, which I joined a while back.
During SNS there is an opportunity to chat and visit with other shops having sales and since this new team there are lots of shops making treasury lists featuring fellow SNS sellers.
I made this one, starting by adding those shops that included an item from my shop.
And here are a few my creations were featured in to share as well.
Wednesday, October 12, 2011
Rummage Sale Finds
Fall is definitely here and so are the rummage sales, great place to get items for craft show displays. I owe a thank you to my sister in law who volunteered recently and had kind of a first pick of the items donated. She managed to snag me 6 metal baskets, my fave for displaying my creations.
Best part, she got all 6 of them for $8.00, recently I have needed to get more of these due to my participation at State of MInd and the local shows I am doing this fall. Here are the baskets she got for me and a quickie makeover for one of them is below.
This one I did a quickie makeover, there was a 6 x 6 inch tile on the bottom, not really my style so a piece of scrapbook paper cut to size covers it nicely.
Tuesday, October 11, 2011
Jessie Costume Ideas and Tutorial (sort of)
We started planning and buying for my daughters Jessie costume I think in March, so no excuses to not get done!
I had purchased from mom to mom sales a pair of jeans for $1.00 and a white oxford for $3.00 feeling very economical and smart for making this costume for such a great price. Well as these things go the devil or cost is in the details.
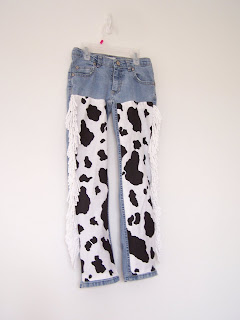
For the costume I had to add cow fabric, yellow fabric and red trim for the shirt, and the white fringe for the jeans which is probably my favorite part was in fact the most expensive, I think my bill still is less then about $20.00 not so bad...but there will be more we still need shoes...or boots as my daughter reminds me and a belt or something that will resemble a belt.
So as it is just the 11th of October I have the jeans and the hat completed, actually for the hat I still want to add ribbon accent and elastic for keeping it in place. And of course there is all that red yarn hair!
Great part about this was learning how to attatch the fabric to the jeans, literally up in bed one night thinking about it I realized that I would have to take the jeans apart slightly to do this with my machine. The option of hand appliqueing was a consideration as well, ultimately I decided this would be easier, I think it was.
I tore out the serged and sewn seams on the outer part of the jeans, from the hem, up to the reinforcement stitching which is just about at the pocket. You can sort of see below, sorry for the blurred pics.
Next I made my cow fabric insert, really all I needed to do was make more or less a rectangle, since the side seam of the jeans was open I just let that hang over and catch it when putting the jeans back together. I ironed a hem for the inner leg and the top (at a slight angle) used lots of pins to pin and place and sewed down to the jeans using a monofilament quilting thread (clear).
To finish, layer the jeans back together inside out with fringe inside, sew jeans back together and re-hem
The red hat was super easy once I found this foam hat at the Dollar Store - hooray, was considering a $25.00 option on Amazon. A simple yarn embellishment makes this close to the Jessie original.
Simple enough I marked all the way around the hat I did about 3/4 inch in from the edge and about 1 inch apart. Weave the yard around and tie off underneath the hat, I also taped it down, left the tails long for now...just in case.
Completed jeans and hat, so excited to have these done, I will be doing posts when I complete the shirt, hair and yes the belt.
Saturday, October 8, 2011
Plastic Fruit Containers for Crafting
I often use plastic templates for creating my items, and usually have on hand quitling template mylar. I recently discovered that I can reuse a raspberry (or any fruit) container. The bottoms and tops are usually solid without vents so for small templates they are perfect. I love that I am not spending 3-5 a sheet for the quilting template and usually we have these containers lying around.
Simple enough just cut the top/bottom so it is flat, and draw your shape. I was very happy to discover that my Sharpie marker did not run when used on this plastic. Since I am most often using these for fabric applications this is a huge plus.
I drew my shape, this will be for 7/8 inch fabric covered buttons. After I traced the button, I marked with dots (just eyeball it) about 3/8 inch extra needed to tuck into the buttons.
Here is my template, reusable over and over until I lose it or run over it with my rotary cutter. I also trimmed the middle circle out so I can center my image.
I can see this cute little lady bug that will become a magnet, trace and cut.
Here is the completed magnet...cute as a bug or button, actually it is both!
Friday, October 7, 2011
Saturday, October 1, 2011
Snack Day Idea and Pork Chop Chili
We have our first snack day tomorrow, once a month we will bring a "snack" for the class to share. The snacks are supposed to be something semi-healthy, whole food type. I saw this as an appetizer and switched it up to be a bit more kid friendly. For about 10 bucks I was able to do a snack for 24 kids.
Simply put grape tomatoes and cubes of cheddar on toothpicks, because kids always like things on sticks. Fun part was my 6 year old was able to help assemble, I then put each into their own Ziploc snack bag.
Next, a great chili recipe:
Fall is here, break out the chili recipes. How can you not love chili, really any chili, so easy to make and tailor to your family likes, spicy, meaty, vegetables, chicken, beef, pork, vegetarian. I go back and forth from crock pot to stove top preparation. This is actually a Weight Watcher recipe I have adapted and make quite often during the cooler months. It calls for pork tenderloin, but if you want to reduce the cost a bit you can use pork chops.
- 1 pound cubed pork
- 1 medium onion, diced
- 2 cans black beans undrained
- 1 can diced tomatoes
- 1 yellow pepper, diced
- 1/2 packet of taco seasoning
- water as needed, I usually add about 1/2 cup
New Business Cards
So I decided since Vistaprint was giving away business cards that I would play around and get something new. I opted for one of their images that had some purses along the side.
I edited way down info and options that I had my previous cards that I have been using for about 4 years. For the front I included business name, my name, etsy store address, blog address and an email, shifting away from my personal email.
The back has just a simple sentence of what it is I make, a large blank spot and at the bottom my etsy address again. I am finding that when I do shows having a blank spot to write additional items will be helpful. I did actually have to pay about $6.00 for the printing on the back and shipping, overall I am pleased and for now have 250 of these new cards.